6.8 KiB
pydase (Python Data Service)
pydase is a Python library for creating data service servers with integrated web and RPC servers. It's designed to handle the management of data structures, automated tasks, and callbacks, and provides built-in functionality for serving data over different protocols.
Features
- Integrated web interface for interactive access and control of your data service
- Support for
rpycconnections, allowing for programmatic control and interaction with your service - Automated task management with built-in start/stop controls and optional autostart
- Event-based callback functionality for real-time updates
- Support for additional servers for specific use-cases
Installation
Install pydase using poetry:
poetry add git+https://github.com/tiqi-group/pydase.git
or pip:
pip install git+https://github.com/tiqi-group/pydase.git
Usage
Using pydase involves three main steps: defining a DataService subclass, running the server, and then connecting to the service either programmatically using rpyc or through the web interface.
Defining a DataService
To use pydase, you'll first need to create a class that inherits from DataService. This class represents your custom data service, which will be exposed via RPC (using rpyc) and a web server. Your class can implement class / instance attributes and synchronous and asynchronous tasks.
Here's an example:
from pydase import DataService

class Device(DataService):

    _current = 0.0
    _voltage = 0.0
    _power = False

    @property
    def current(self):
        # run code to get current
        return self._current

    @current.setter
    def current(self, value):
        # run code to set current
        self._current = value

    @property
    def voltage(self):
        # run code to get voltage
        return self._voltage

    @voltage.setter
    def voltage(self, value):
        # run code to set voltage
        self._voltage = value

    @property
    def power(self):
        # run code to get power state
        return self._power

    @power.setter
    def power(self, value):
        # run code to set power state
        self._power = value

    def reset(self):
        self.current = 0.0
        self.voltage = 0.0
In the above example, we define a Device class that extends DataService. We define a few properties (current, voltage, power) and their getter and setter methods.
Running the Server
Once your DataService is defined, you can create an instance of it and run the server:
from pydase import Server

# ... defining the Device class ...

if __name__ == "__main__":
    service = Device()
    Server(service).run()
This will start the server, making your Device service accessible via RPC and a web server at http://localhost:8001.
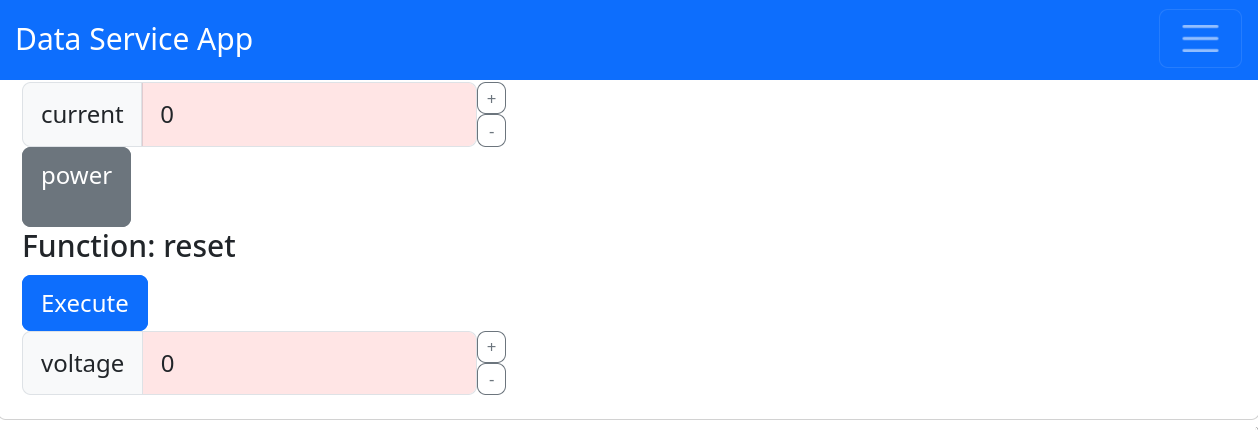
Accessing the Web Interface
Once the server is running, you can access the web interface in a browser:
In this interface, you can interact with the properties of your Device service.
Connecting to the Service using rpyc
You can also connect to the service using rpyc. Here's an example on how to establish a connection and interact with the service:
import rpyc

# Connect to the service
conn = rpyc.connect("<ip_addr>", 18871)
client = conn.root

# Interact with the service
client.voltage = 5.0
print(client.voltage)  # prints 5.0
In this example, replace <ip_addr> with the IP address of the machine where the service is running. After establishing a connection, you can interact with the service attributes as if they were local attributes.
Understanding Tasks in pydase
In pydase, a task is defined as an asynchronous function contained in a class that inherits from DataService. These tasks usually contain a while loop and are designed to carry out periodic functions.
For example, a task might be used to periodically read sensor data, update a database, or perform any other recurring job. The core feature of pydase is its ability to automatically generate start and stop functions for these tasks. This allows you to control task execution via both the frontend and an rpyc client, giving you flexible and powerful control over your service's operation.
Another powerful feature of pydase is its ability to automatically start tasks upon initialization of the service. By specifying the tasks and their arguments in the _autostart_tasks dictionary in your service class's __init__ method, pydase will automatically start these tasks when the server is started. Here's an example:
from pydase import DataService, Server

class SensorService(DataService):
    def __init__(self):
        self.readout_frequency = 1.0
        self._autostart_tasks = {"read_sensor_data": ()}  # args passed to the function go there
        super().__init__()

    def _process_data(self, data: ...) -> None:
        ...

    def _read_from_sensor(self) -> Any:
        ...

    async def read_sensor_data(self):
        while True:
            data = self._read_from_sensor()
            self._process_data(data)  # Process the data as needed
            await asyncio.sleep(self.readout_frequency)


if __name__ == "__main__":
    service = SensorService()
    Server(service).run()
In this example, read_sensor_data is a task that continuously reads data from a sensor. The readout frequency can be updated using the readout_frequency attribute.
By listing it in the _autostart_tasks dictionary, it will automatically start running when Server(service).run() is executed.
As with all tasks, pydase will also generate start_read_sensor_data and stop_read_sensor_data methods, which can be called to manually start and stop the data reading task.
Documentation
The full documentation provides more detailed information about pydase, including advanced usage examples, API references, and tips for troubleshooting common issues. See the full documentation for more information.
Contributing
We welcome contributions! Please see CONTRIBUTING.md for details on how to contribute.
License
pydase is licensed under the MIT License.
