6.3 KiB
Auto-generated Frontend
pydase automatically generates a frontend interface based on your service definition, representing the current state and controls of the service.
It simplifies the process of visualization and control of the data and devices managed by your pydase service, making it accessible to both developers and end-users.
Through the integration of Socket.IO, the frontend provides real-time updates, reflecting changes as they occur and allowing for immediate interaction with the backend.
Accessing the Frontend
You can access the auto-generated frontend by navigating to the hostname of the device the service is hosted on, followed by the exposed port:
http://<hostname>:<port>/
The frontend uses a component-based approach, representing various data types and control mechanisms as distinct UI components. For more information about this, please refer to Components Guide.
Customization Options
pydase allows you to enhance the user experience by customizing the web interface's appearance through
- a custom CSS file, and
- a custom favicon image, and
- tailoring the frontend component layout and display style.
For more advanced customization, you can provide a completely custom frontend source.
Custom CSS Styling
You can apply your own styles globally across the web interface by passing a custom CSS file to the server during initialization. Here's how you can use this feature:
-
Prepare your custom CSS file with the desired styles.
-
When initializing your server, use the
cssparameter of theServerclass to specify the path to your custom CSS file.
from pydase import Server, DataService


class MyService(DataService):
    # ... your service definition ...


if __name__ == "__main__":
    service = MyService()
    server = Server(service, css="path/to/your/custom.css").run()
This will apply the styles defined in custom.css to the web interface, allowing you to maintain branding consistency or improve visual accessibility.
Please ensure that the CSS file path is accessible from the server's running location. Relative or absolute paths can be used depending on your setup.
Custom favicon image
You can customize the favicon displayed in the browser tab by providing your own favicon image file during the server initialization.
Here's how you can use this feature:
- Prepare your custom favicon image (e.g. a
.pngfile). - Pass the path to your favicon file as the
favicon_pathargument when initializing theServerclass.
Here’s an example:
import pydase


class MyService(pydase.DataService):
    # ... your service definition ...


if __name__ == "__main__":
    service = MyService()
    pydase.Server(service, favicon_path="./my/local/my-favicon.png").run()
This will serve the specified image instead of the default pydase logo.
Tailoring Frontend Component Layout
You can customize the display names, visibility, and order of components via the web_settings.json file.
Each key in the file corresponds to the full access path of public attributes, properties, and methods of the exposed service, using dot-notation.
- Custom Display Names: Modify the
"displayName"value in the file to change how each component appears in the frontend. - Control Component Visibility: Utilize the
"display"key-value pair to control whether a component is rendered in the frontend. Set the value totrueto make the component visible orfalseto hide it. - Adjustable Component Order: The
"displayOrder"values determine the order of components. Alter these values to rearrange the components as desired. The value defaults toNumber.MAX_SAFE_INTEGER.
The web_settings.json file will be stored in the directory specified by the SERVICE_CONFIG_DIR environment variable. You can generate a web_settings.json file by setting the GENERATE_WEB_SETTINGS to True. For more information, see the configuration section.
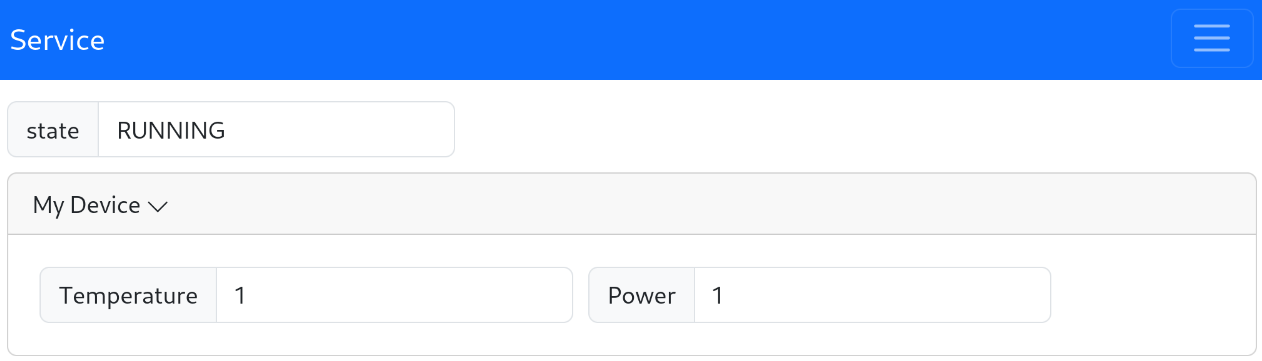
For example, styling the following service
import pydase


class Device(pydase.DataService):
    name = "My Device"
    temperature = 1.0
    power = 1


class Service(pydase.DataService):
    device = Device()
    state = "RUNNING"


if __name__ == "__main__":
    pydase.Server(Service()).run()
with the following web_settings.json
{
    "device": {
        "displayName": "My Device",
        "displayOrder": 1
    },
    "device.name": {
        "display": false
    },
    "device.power": {
        "displayName": "Power",
        "displayOrder": 1
    },
    "device.temperature": {
      "displayName": "Temperature",
      "displayOrder": 0
    },
    "state": {
        "displayOrder": 0
    }
}
looks like this:
Specifying a Custom Frontend Source
To further customize your web interface, you can provide a custom frontend source.
By specifying the frontend_src parameter when initializing the server, you can host a tailored frontend application:
from pathlib import Path

import pydase


class MyService(pydase.DataService):
    # Service definition


if __name__ == "__main__":
    service = MyService()
    pydase.Server(
        service,
        frontend_src=Path("path/to/your/frontend/directory"),
    ).run()
pydase expects a directory structured as follows:
<your_frontend_directory>
├── assets
│   └── ...
└── index.html
Any CSS, js, image or other files need to be put into the assets folder for the web server to be able to provide access to it.
Example: Custom React Frontend
You can use vite to generate a react app template:
npm create vite@latest my-react-app -- --template react
TODO: Add some useful information here...
To deploy the custom react frontend, build it with
npm run build
and pass the relative path of the output directory to the frontend_src parameter of the pydase.Server.
Note that you have to make sure that all the generated files (except the index.html) are in the assets folder. In the react app, you can achieve this by not using the public folder, but instead using e.g. src/assets.